![]()
![]()
My first year of beekeeping I bought two Nucs, starting my second year I had one hive left and was able to split it and capture a swarm. I went into the winter with 3 strong hives. Unfortunately like many beekeepers I only had one out of three hives alive this spring. I wanted to grow my apiary and package bees were my best option.
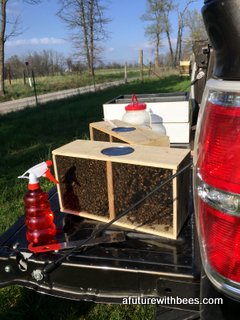
I actually got lucky and joined Jeff to travel to GA to pick up the packages of bees and some queens. But that’s another story. So let’s talk about installing packages of bees, I got very experienced quickly. The day we got home it was 7 am and we started installing packages immediately. I watched and learned how to install about 4 packages, then Jeff threw me in the deep end and by the end of the day I installed about 10 packages of bees in various hives and Nuc boxes.
When I got to my home I had my two packages to install and the day was still warm enough to do the install. First things to consider when installing a package is weather: Is it cold or rainy? What are the current weather conditions? In my case it was hot for April and not supposed to cool down at day or night for several days.
1) Weather
a) Can my package survive if I install them that day or evening?
b) Your bees are not going to get out of the box so it’s ok to keep them in a location in your home that moderate temperatures. If you’re comfortable most likely the bees are comfortable.
c) Remember allowing them to get to hot is just as dangerous as letting them get to cold.
d) The bees generate their own heat if you look at the screen box and the bees are clumped together in a single ball of bees they are most likely cold. (Keep them dry!) If they are all spread out over the box and fanning their wings it’s a good bet they are hot.
e) You can wait a couple days to install packages but the quicker you put them in the hive the more successful they can be with the least stress.
f) Best Opportunity:
i) Temp over 60 degrees during installation
ii) Sunny or only partly cloudy
iii) Temp will not drop below the mid 40’s at night for a couple nights
iv) Calm windless day, best but wind isn’t as big as an issue as cold
Stepping back one second, let me make a strong suggestion you should be talking with the person you’re buying your packages from and be ready to accept them for installation. If they call and say we will have your package available tomorrow or “on Tuesday” don’t say” I’m not ready? or Can I wait a few days?” The beekeeper who just babied your girls for 1,000 miles will expect you to be ready for your bees. In our case we had our bees back in Missouri less than 24 hours from when they were pulled from their original hives. We had an excellent trip and very low bee losses.
2) Timing
a) Be ready to accept your bees, have a plan on installing your bees.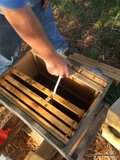
b) Have your hives setup in place ready to accept the packages.
c) Remember you’re in charge of those bees the second they are delivered. It’s up to you to make that package successful.
Let’s assume, the weather isn’t a concern and you are ready to do your installation:
Tools:
• Hive tool
• Needle nose plyers
• Staple gun
• Smoker
• Feeder
• Spray bottle
• Syrup
Now if you have drawn comb like I did from my dead-out hives it’s a great idea to start them out with drawn comb and half foundation checker boarded. Remember its part of the nature of bees to draw comb so you have to give them some foundation and not just drawn comb. If all you have is frames of foundation no worries it will be fine just takes them a bit longer to get up to speed. If you’re getting your package in April or early March you have plenty of time for the bees to draw comb.
Each beekeeper has their own preferences I use was foundation and not plastic. It has been my experience that bees generally draw the wax faster, more evenly and easier than plastic. In any hives with plastic I have to constantly move frames around to convince the bees to draw out the plastic frames. If you do use plastic I strongly suggest you melt some wax and paint them with a thin layer...even if they say the frames are coated already.
 3) Let’s install the package:
a) Take off your hive cover and remove 4 frames out of the center of the hive. This gives you space to work.
b) Take the board covering the syrup can and holding queen cage off the top of the package.
c) Spray your bees down through the screen with sugar water on all sides (if the weather is ok then don’t go light on the spray) this will allow the bees to not fly as much and clump together to clean each other.
d) Holding the strap to the queen cage, use your plyers to pull the syrup can out of the package. Set the syrup can off to the side.
e) Spray into the hole the sugar water in each direction to cover those in the middle.
f) Remove the queen cage and cover the opening to the package.
g) Visually check to make sure your queen is alive.
h) Take your queen cage and gently brush or shake the bees off the cage into the hive.
i) Using a screw remove the cork at the end of the cage and check to make sure you have the right end that has the candy plug not accidently letting her out immediately.
j) Staple the tab attached to the queen cage to the top of a frame putting the cage between two frames with the candy plug facing down.
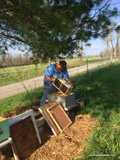
k) Grab your package and remove the cover, gently knock the package to dislodge the bees to the bottom of the package.
l) Turn the package box upside down over the hive and shake it back and forth gently pouring the bees out of the package. When most of the are outside the box set the box on the ground near the entrance.
m) Gently install the missing frames, minus 1 frame because of the queen cage between the frames.
n) Now add your feeder and syrup then put the covers back on top of the hive.
o) Give them time to settle in and return in 3 days to remove cage if the queen is free.
p) If she is free add the missing frame
q) If she is not free gently push a small nail through the candy plug and reinsert check again in one day.
r) Feed your package till the nectar flow gets started
Please review the gallery below by clicking on any picture and enjoy the video.


